Affiliate Disclosure:This article contains affiliate links. If you purchase through our links, we may earn a small commission at no extra cost to you. We only recommend gear we've tested or would genuinely use ourselves.
how to • May 13, 2026 • 15 min read · The Bite Intel Team
How to Rig a Kayak for Fishing: The Complete Setup Guide
Learn exactly how to rig a kayak for fishing — rod holders, anchor systems, storage, seating, lighting, and safety gear. Step-by-step guide for beginners.
You just got a kayak. You're excited. Then you set it on the floor and realize it's just a plastic hull with a seat and two handles. No rod holders. No storage. No way to anchor. Nothing.
That bare kayak isn't going to catch fish on its own. Rigging it — turning that plastic shell into an actual fishing platform — is what separates an afternoon of frustration from a day you want to repeat.
The good news: rigging a kayak for fishing isn't complicated. It doesn't require drilling holes or spending thousands of dollars. Most setups can be assembled for under $300, and you can do it in a weekend. This guide walks you through every component, in the order that matters, so you know exactly what to add and why.
What "Rigging" Actually Means
Rigging is the process of equipping your kayak with everything it needs to function as a fishing platform. That includes:
- Rod holders — so your hands are free to paddle
- Anchor system — so you stop drifting off your spot
- Storage — for tackle, tools, food, and gear
- Seating — comfort for all-day sessions
- Safety gear — lights, PFD, whistle, and communication
- Fishing accessories — nets, dry bags, fish finders (optional)
A bare kayak can technically fish, but you'll spend your whole time managing the paddle, chasing your drift, fumbling for tackle, and coming home sunburned and sore. A rigged kayak lets you focus on actually catching fish.
The goal is a clean, functional setup where every item has a place, nothing gets in your way, and you can reach what you need without capsizing.
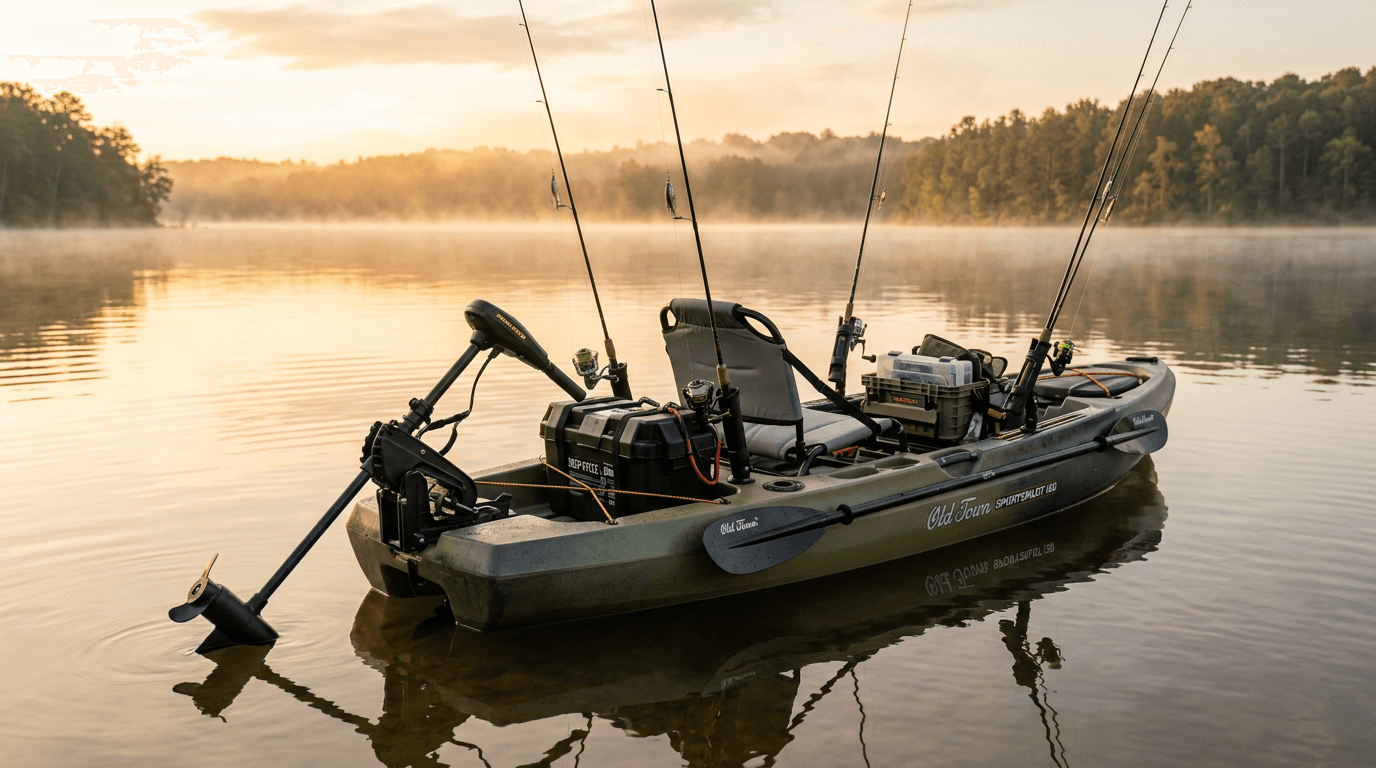
Step 1: Rod Holders
Rod holders are the first thing to add. Without them, every rod you bring is a hazard — they roll around, get tangled in your paddle, and slide overboard. With them, your hands are free and your rods are safe.
Types of rod holders:
- Flush mount: Permanent, installed directly in the kayak hull. Low profile, no snag risk. Requires drilling.
- RAM-mount style: Clamp-based, no drilling required. Adjustable angle. Great for renting or if you want flexibility.
- Milk crate-style: Rod holders built into a gear crate — the easiest way to add multiple holders at once.
How many do you need?
At minimum, two. One for trolling while you paddle, one for a second rigged rod. Most kayak anglers run 3–4. A gear crate with built-in rod holders (more on that in Step 3) handles most of this without extra installation.
For a deep dive on options, mounting angles, and which systems work best by kayak type, read our kayak rod holder buying guide.
Shop Kayak Rod Holders on AmazonTip
If you don't want to drill, RAM-mount rod holders clamp onto existing tracks or rails. Many fishing kayaks come with gear tracks already installed — check yours before buying anything.
Step 2: Anchor System
The second-biggest frustration in kayak fishing: you find the spot, you cast, and then you slowly drift away from it before you can finish your retrieve. An anchor fixes this.
But anchoring a kayak isn't the same as anchoring a boat. Drop a fixed anchor from the bow or stern and the kayak will swing sideways in current or wind. The water and wind push you broadside, you list, and in a bad current, that's a capsizing risk.
The solution: an anchor trolley.
An anchor trolley is a pulley system that runs along the side of the kayak from bow to stern. You clip your anchor rope to a ring on the trolley, and you can slide the anchor point anywhere from front to back. Want to present your bow to the current? Slide the anchor forward. Want to hold sideways? Middle. Want to backtroll? Rear.
It's the single most functional addition you can make to a fishing kayak after rod holders.
See our full breakdown of the best options and how to install one: best kayak anchor trolley kit.
Shop Anchor Trolley Kits on AmazonWhat anchor to use?
For most kayak fishing — calm lakes, ponds, slow rivers — a 1.5 lb to 3 lb folding grapnel anchor works fine. In strong current, go heavier. In mud or sand, a mushroom anchor holds better.
Shop Kayak Anchors on AmazonWarning
Never anchor from a fixed point at your bow or stern in moving water. If current catches your hull broadside while the anchor holds, the kayak can flip. Always use a trolley system or at minimum a quick-release clip.
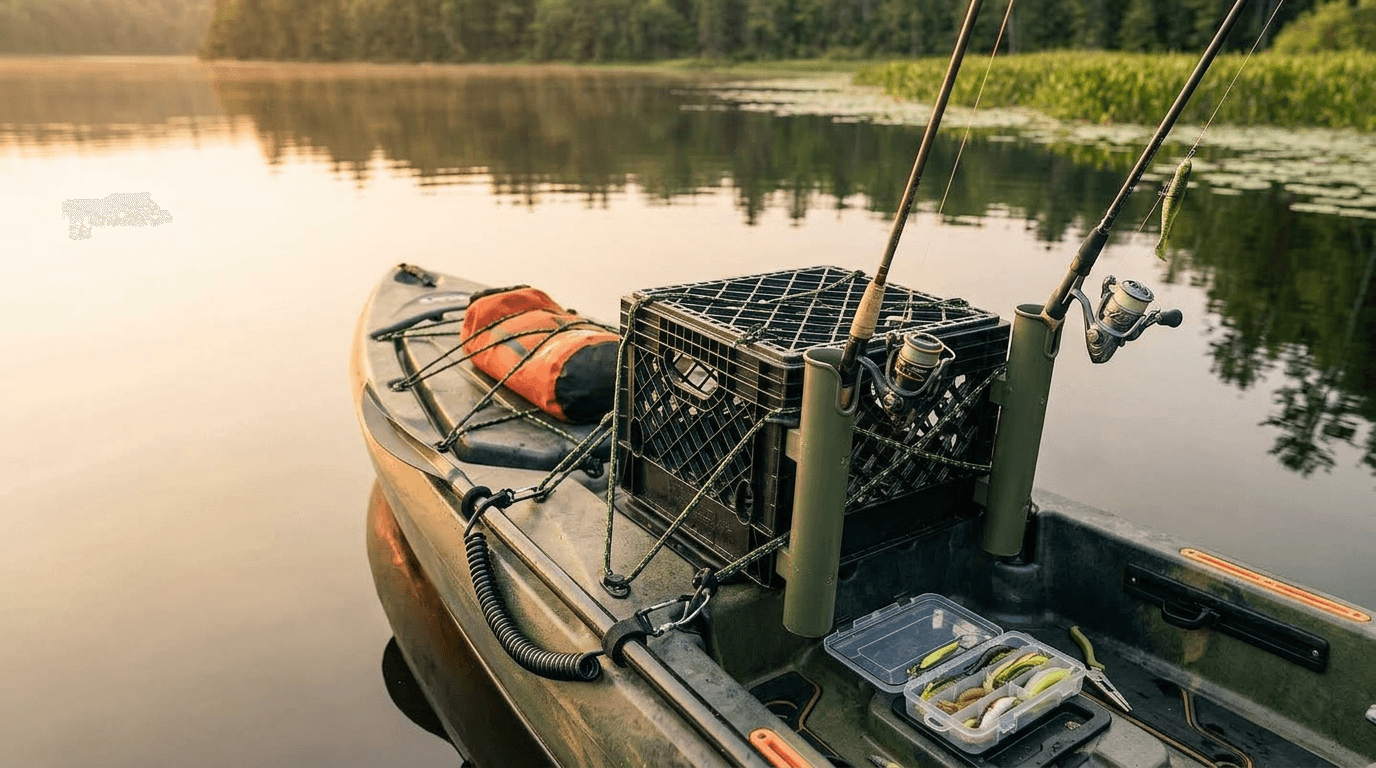
Step 3: Storage and Gear Organization
A kayak with no storage organization turns into a floating dumpster after one trip. Tackle boxes slide around, pliers fall overboard, and you spend ten minutes digging for a lure you know is in there somewhere.
The kayak fishing crate is the answer to most of this. It's a modified plastic milk crate that mounts in the rear tank well of your kayak. It holds rod holders, tackle bags, a ruler, pliers, and everything else you need within arm's reach.
The crate sits in the tank well without hardware — it's held in place by the well walls and gear weight. You can pull the whole thing out after a trip and use it as a carry-all to your truck.
We have a full guide to selecting the right crate: best kayak fishing crate. And if you want to know exactly how to set one up and organize it, read: how to set up a kayak fishing crate.
Shop Kayak Fishing Crates on AmazonWhat goes in front of you?
The area in front of the seat (your lap and the bow tank well) is for active-use items: sunscreen, a water bottle, your phone if it's not in a dry bag, and anything you grab constantly. Don't cram it full or you'll be digging around in the middle of a fight.
Dry storage:
Electronics, wallets, keys, and anything that cannot get wet needs to be in a dry bag. These roll-top bags are watertight, float if you capsize, and fit in virtually any kayak compartment. For options and how to choose the right size: kayak fishing dry bag buying guide.
Shop Kayak Dry Bags on AmazonStep 4: Seating
A stock kayak seat is designed to get you from A to B, not to fish from for 6 hours. The cheap foam backband that comes on most entry-level kayaks causes back pain within an hour.
Upgrading your seat changes the entire experience. A good fishing seat has:
- High backrest for lumbar support
- Adjustable angle
- Side pockets for pliers and terminal tackle
- Ability to raise above the hull (high-back style) for better visibility and paddling mechanics
You can swap most aftermarket seats onto any sit-on-top or sit-inside fishing kayak without modification — they attach to the same D-ring or rail system your current seat uses.
Our guide covers the best options at every price point: best kayak seat upgrades for fishing.
Shop Kayak Seat Upgrades on AmazonTip
If you fish more than 3 hours at a stretch, a quality seat upgrade is the highest-impact single purchase you can make. Back pain ends trips early — this prevents that.
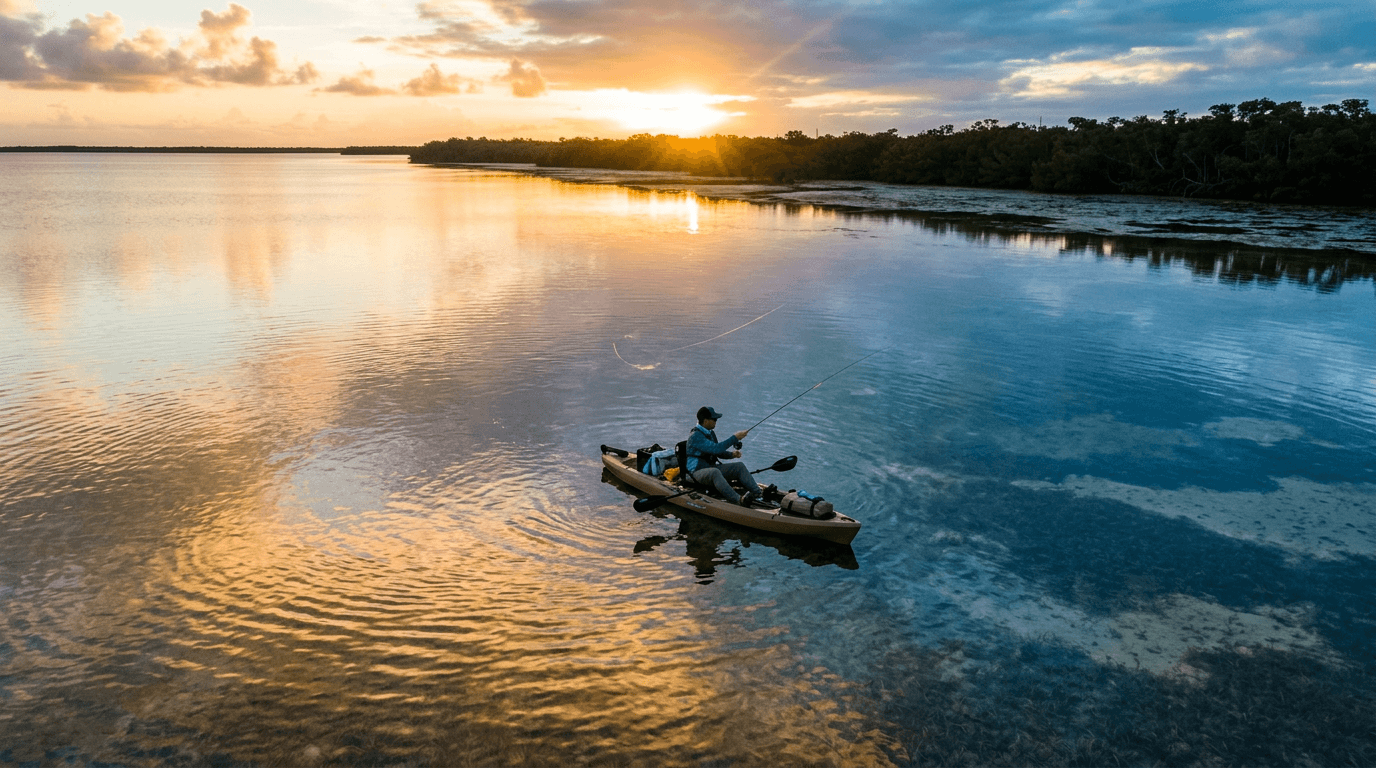
Step 5: Paddle Selection
Your paddle is your engine. A heavy, poorly-matched paddle drains your energy before you even reach the spot. Most beginner setups come with a cheap, heavy aluminum paddle that works fine for short distances but becomes a burden on longer paddles.
Key specs for a fishing kayak paddle:
- Length: Match paddle length to kayak width and your height. A wider kayak needs a longer paddle (240–250 cm is common for fishing kayaks).
- Blade shape: Wider blades move more water per stroke (better for slow, powerful paddling in current). Narrower blades are more efficient for distance.
- Material: Fiberglass blades are a noticeable step up from plastic. Carbon is lighter but more expensive.
For kayak fishing specifically, a shaft with a hook retriever built in or a bright color you can spot when it floats away is a nice bonus.
We tested the Bending Branches Angler Classic — one of the most popular fishing paddles at its price point — and reviewed it here: Bending Branches Angler Classic review.
Shop Kayak Fishing Paddles on AmazonStep 6: Safety Gear and Lights
Safety gear isn't optional. Beyond being the right thing to do, it's legally required in most states.
PFD (Personal Flotation Device):
Wear it. Every trip. A life jacket hanging from a bungee cord behind you doesn't help if you're unconscious in the water after a capsize. Type III fishing PFDs are designed specifically for kayak anglers — they have large arm holes for casting mobility, mesh panels for venting, and pockets for tackle, pliers, and a knife.
Signaling devices:
A whistle attached to your PFD is legally required in most states. A waterproof signal mirror and a small waterproof flashlight are worth carrying for emergency situations.
Navigation lights:
If you fish before sunrise or after sunset — and most serious kayak anglers do — you're legally required to display lights. A white 360-degree light visible from 2 nautical miles satisfies the Coast Guard requirement for non-powered vessels under 7 meters.
We've tested the best options: best kayak fishing lights for night fishing.
Shop Kayak Navigation Lights on AmazonFloat plan:
Tell someone where you're going and when you expect to be back. This costs nothing and has saved lives.
Step 7: Landing Net
Catching a fish is only half the battle. Landing it cleanly — without losing it boat-side, dropping your paddle, or tipping the kayak — requires a good net. A kayak-specific net is shorter-handled than a boat net (you're sitting much lower) and has a rubberized mesh that's gentler on fish if you're practicing catch-and-release.
Magnetic net releases clip to your PFD or crate and hold the net in place until you need it — a huge quality-of-life upgrade over fumbling with a net that's sliding around your hull.
For sizes, handle lengths, and what to look for: kayak fishing net buying guide.
Shop Kayak Fishing Nets on AmazonStep 8: Stability — When to Add Outriggers
Most sit-on-top fishing kayaks are stable enough for most anglers in calm to moderate conditions. But if you want to stand while fishing — which gives you a massive visibility advantage in shallow water — or if you paddle in open water with chop, outriggers significantly increase your stability.
Kayak outriggers (also called stabilizers or amas) are float arms that extend from both sides of the hull, turning your single-hull kayak into a trimaran configuration. Modern designs fold up when not needed, so they don't affect your paddling.
If you're a larger angler, fish in wind-exposed water, or want to stand and sight-fish, read our guide: best kayak outriggers for fishing.
Shop Kayak Outriggers on AmazonRecommended Gear Summary by Category
Here's the complete gear stack for a fully rigged fishing kayak:
| Category | Budget Pick | Mid-Range | Premium |
|---|---|---|---|
| Rod Holders | Rail-mount flush set | RAM-mount adjustable | YakAttack GearTrac system |
| Anchor System | DIY trolley kit | Harmony kayak trolley | NRS anchor trolley |
| Crate / Storage | Repurposed milk crate | Pre-built kayak crate | YakGear crate with accessories |
| Seat | OEM replacement foam | Surf to Summit GTS seat | Skwoosh kayak pad + backband |
| Paddle | Pelican aluminum | Bending Branches Angler Classic | Werner Camano fiberglass |
| Safety / Lights | Princeton Tec Remix | Railblaza Starport | Litra Torch 2.0 |
| Net | Ego rubber net | Frabill Power Catch | YakAttack BoomStick net |
Beginner Rigging Mistakes to Avoid
1. Drilling before planning. Flush-mount rod holders are permanent. Get on the water with a basic setup first, figure out where things actually need to be, then drill. Many beginners drill in the wrong spots and regret it.
2. Too much gear. A heavily loaded kayak sits low in the water, paddles sluggishly, and tips more easily. Start minimal. Add gear as you identify genuine needs.
3. Skipping the anchor trolley. Anchoring from the bow without a trolley is how kayaks flip. Don't skip this step or rig a cheap fixed-point anchor.
4. Cheap seat, expensive rods. Anglers spend money on rods and reels, then suffer on a $20 seat for 8 hours. Reverse your priorities. Comfort keeps you on the water longer, which catches more fish.
5. No dry bag for valuables. Kayaks tip. Water gets in. A phone and wallet at the bottom of your hull after a capsize is an expensive mistake you only make once.
6. Loose gear with no tethers. Pliers, forceps, measuring boards, and tools should be tethered to the kayak or your PFD. If it falls overboard untethered, it's gone. Coiled lanyards are cheap insurance.
7. Skipping the PFD. This one is obvious but worth saying. Wear it. Every time.
Frequently Asked Questions
Q: Do I need to drill holes in my kayak to add rod holders?
Not necessarily. Rail-mount and RAM-mount systems clamp to existing gear tracks without drilling. Many modern fishing kayaks come with factory tracks specifically for accessories. If your kayak has tracks, start there. If it doesn't, flush-mount installation is straightforward — it only requires a hole saw, a few minutes, and marine sealant.
Q: How much does it cost to fully rig a kayak?
A functional rig — rod holders, anchor trolley, basic crate, seat upgrade, and safety gear — runs $150–$350 depending on your choices. A fully loaded setup with fish finder, outriggers, and premium accessories can reach $800–$1,500. Most beginners should target the $250–$400 range.
Q: Can I rig a sit-inside kayak for fishing?
Yes, though it's more limited. Sit-insides have less deck real estate for accessories and the cockpit restricts certain rod holder placements. The crate concept doesn't work the same way (sit-insides often have a rear hatch, not an open tank well). Most serious kayak fishing is done on sit-on-top kayaks precisely because they're easier to rig and self-bail if you take on water.
Q: What's the first thing I should add to a new kayak?
Rod holders, then an anchor system. These two additions solve the two biggest problems beginners face — rods rolling around and constantly drifting off fish. Everything else is comfort or convenience.
Q: Do I need an anchor if I only fish ponds and calm lakes?
Technically no — you can drift and reposition with your paddle. But even a light breeze on a calm pond will push you off your spot constantly. A small folding grapnel anchor and a basic trolley setup is a cheap fix that makes flat-water fishing dramatically more productive. If you're just bank-hopping and casting, skip it. If you're targeting specific structure or depth, anchor.
Your Rigged Kayak Checklist
Use this before every launch to make sure you're set:
| Product | Price | Best For | Link |
|---|---|---|---|
| Rod holders (min. 2) | $20–$60 | Hands-free paddling | Check Price |
| Anchor trolley + anchor | $30–$80 | Holding position | Check Price |
| Kayak fishing crate | $25–$90 | Gear organization | Check Price |
| Upgraded seat | $50–$200 | All-day comfort | Check Price |
| Paddle (fishing-specific) | $60–$200 | Efficient propulsion | Check Price |
| Type III fishing PFD | $50–$150 | Safety (required) | Check Price |
| Navigation lights | $20–$80 | Dawn/dusk/night legal compliance | Check Price |
| Rubberized landing net | $30–$80 | Landing fish without damage | Check Price |
| Dry bag (10–20L) | $15–$50 | Protecting electronics/keys | Check Price |
| Outriggers (optional) | $80–$250 | Standing, open water stability | Check Price |
Final Thoughts
Rigging a kayak for fishing is less about buying everything at once and more about building a setup that matches how you actually fish. Start with the essentials — rod holders, anchor system, basic crate, and a PFD — and add from there as you identify what you actually need on the water.
The best rig is the one you have dialed in for your body, your kayak, and your fishery. A 6-foot bass angler fishing shallow southern ponds needs a different setup than a 6-foot striper angler paddling tidal rivers in November. Use this guide as your framework, then customize.
Go fish.
Related Posts
How to Add a Trolling Motor to a Kayak: Complete Installation Guide
Learn how to add a trolling motor to a kayak step-by-step, including thrust sizing, mount types, wiring, battery selection, and state registration rules.
Inshore Kayak Fishing Tips for Beginners: 12 Things Nobody Tells You First
Inshore kayak fishing tips for beginners covering tides, tackle, conditions, and self-rescue so your first saltwater trip doesn't end in frustration.
DIY Fishing Kayak Setup: 7 Modifications That Cost Under $100 Total
Rig your fishing kayak with rod holders, anchor trolley, and fish finder for under $100. Step-by-step diy fishing kayak mods with specific products and prices.